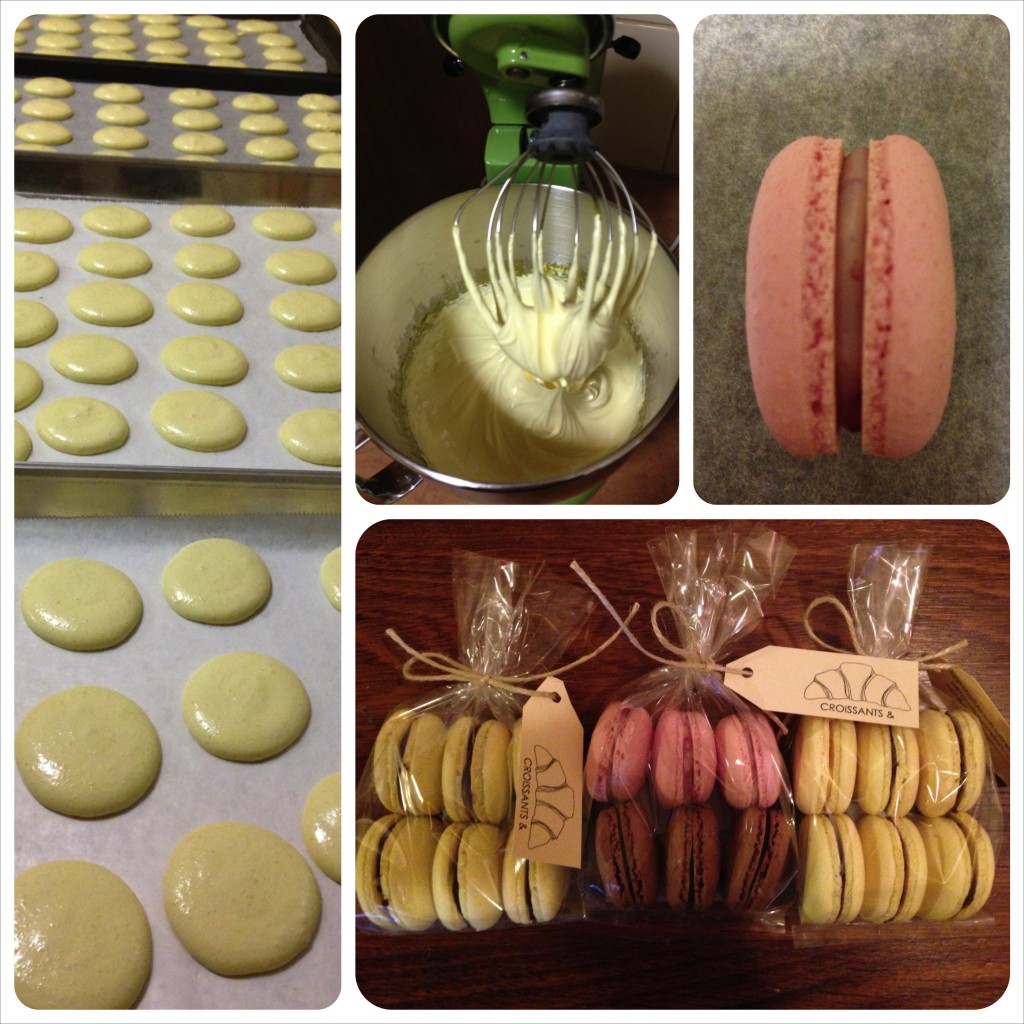
Macarons are up!

macaron orderFirst orders are in and they’re ready to go. It’s been an interesting couple of days trialling these. It’s been work, home, bake, sleep, work, home, bake…almost time for more sleep.

Who wouldn’t want to buy these? They’re colourful, shiny and yummy!

You too could pick some up, and other delicious treats, at my first market appearance. Stay tuned to find out when/where that will be!

Princess (Lemon & Yoghurt) Cake

princess cakeI was charged with making a birthday cake for a work colleague, Bianca. I wanted to make something a fun. I put on my thinking hat and thought about what she likes. She likes footy, Geelong in particular, she and I share a passion for Gorman clothes – both, I thought, were too tricky to make into a cake. I call Bianca my little princess, mainly due to her dislike of camping, so I began my search for princess cakes.

Here is my attempt at a princess cake. I think I did well – she was so pretty! You can turn practically any cake into a princess cake, as long as you use a fluted ring tin. I wanted to do something other than chocolate, and found this lemon and yoghurt cake (using lemons from our tree). Pretty icing will turn your cake into a BIG beautiful flowing skirt. I found the doll in the supermarket by chance for $2, I was looking for a brunette, like Bianca, but had to settle for this little blondie. She was a little tall for her cake “dress” so she had to lose a little off her legs. Princess legs are not as easy to shorten as you’d think! The pretty decorating pearls can be found in supermarkets or specialty cake shops.

Once the cake is baked, cooled, iced and decorated, gently lower your princess into the centre – adjust the height of your princess as required.

I hope you enjoy your princess cake as much as we did!

Ingredients
1 1/2 cups caster sugar
2 eggs
1/2 tsp salt
3 tbsp lemon juice
Grated rind of 2 lemons
1/2 cup olive oil
1 cup natural yoghurt
2 cups self-raising flour
Icing
1 cup icing sugar
1 or more tbsp of lemon juice
1 tbsp butter, softened
1 drop pink food colour

Method

Preheat oven to 180°C.

It’s very important with a fluted tin to grease it exceptionally well. I have had several cakes end up in several pieces after sticking to the tin. It’s not so easy to get a knife in and around a fluted tin! My tip is to butter the tin well, very well, and dust it with flour, make sure to tip out any excess flour.

In a bowl whisk together sugar, eggs, salt, juice, rind & oil. Stir through yoghurt until combined and then fold through the flour…as easy as that!

Bake for 30 minutes, or until a skewer inserted comes out clean. Cool the cake for 10 minutes before turning out of the tin.

When the cake is almost cool, make the icing. Combine the icing sugar, lemon juice, butter and food colour. The mixture should be quite thick so it doesn’t run straight off as it’s poured over the cake. Decorate with pearls before the icing has set.

If you’re after a little more adult version of this cake, omit the pink food colour and pearls.
IMG_4340

If you’ve enjoyed this post, please “like” it on Facebook, or even share it. Thanks! x
The beginning of a BIG adventure

So, I’ve had a crazy idea brewing for a while. That is, to take my baking to the West Gippsland public at market. Since living in Warragul it has been difficult to find good bread (with the exception of our local green grocer which brings in artisan bread from Western Victoria a few times a week) and good croissants. I suppose that’s what’s kept me baking my own bread. I started the croissant journey because I wanted to have croissants at our wedding brunch and stupidly thought it would be a good idea to make them myself. Worth it in the end, they received rave reviews. The next idea was to spread the love a little further and sell them at local markets. That’s not so crazy, except I also have a full-time job and croissants are very time-consuming to make. I purchased my industrial size mixer earlier this year which spurred the crazy idea along even more. Next thing I had my kitchen approved by local council to operate commercially 2 days a week. All of a sudden, it’s coming a reality, I’m really doing this!

Let’s just see how it goes. It could be great…it could be a flop! But, I’ll never know until I give it a go. My husband will just be happy for me to get this idea out of the system! I’ve had a few practice runs, trialling different combinations. I’ve had a macaron and a macaron success and think I’ve got it all sorted. Work colleagues, friends and family are loving the samples! I have even had a few orders all before my market doors open. My boss told me not to quit my day job, then promptly put in an order for 3 dozen croissants. Does that mean I’m good at my day job and at croissants?!

I’m excited that in the beginning I’ll be selling croissants, almond croissants, pain au chocolat (chocolate croissants), macarons, canale and gingerbread. Hopefully something for everyone…unless you don’t like sugar and/or butter, but that can’t be too many people, right?!
market collage
I’ll be at market under the Croissants & banner, because that’s what I’ll have…croissants & and other treats. But, before market day all I need to do is find a suitable tent/shelter to operate under on market day and pick my first market. I think it will be either Jindivick on Sept 7th or Rokeby on Sept 14th. Stay tuned and come and pay a visit, I’d love to see you there!

To market, to market, we’re almost there!

If you think your friends will enjoy a day out in beautiful West Gippsland invite them to like “Something For Pudding” and they’ll be kept up to date with where I’ll be.


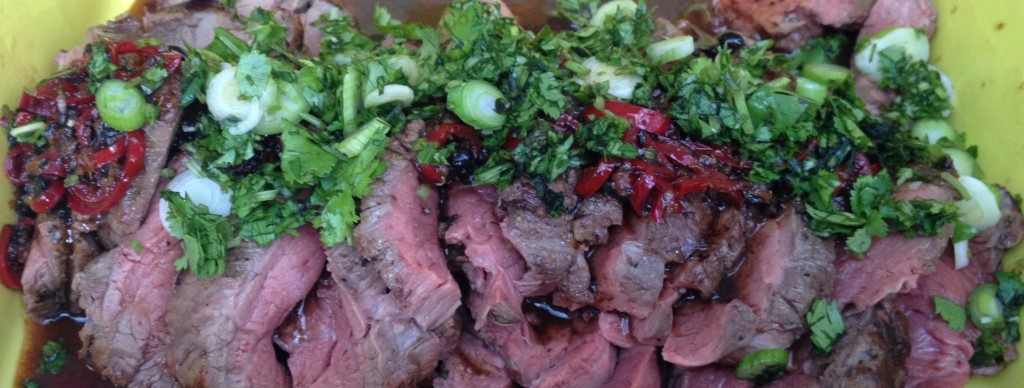
Beef fillet with black bean dressing

IMG_2241

This is a perfect special occasion meal, such as a dinner party or date night. The dressing, chopped coriander and spring onions, trussing the fillet can all be done in advance, leaving just the fillet to be cooked prior to serving. The only trick is sourcing the black beans. They can usually be found in Asian grocers…not in Warragul supermarkets!

Ingredients
1 tsp olive oil
1 x 1.5kg beef fillet
3 spring onions
1 cup coriander, chopped
Dressing
15g canned black beans, rinsed & lightly crushed
1 long red chilli, seeds removed & finely sliced
1 tsp ginger, grated
1/2 tsp sesame seed oil
1 1/2 tbsp soy sauce
1 tbsp mirin
1 tbsp lime juice
40 ml olive oil

Method
Preheat the oven to 180°C. Truss the beef fillet with kitchen string, tying at even intervals. Season with sea salt and freshly cracked pepper. Heat 1 tbsp of oil in an oven-proof frying pan over high heat. Sear on all sides until brown. Place in the oven and bake for 15-20 minutes. This should be medium rare, adjust cooking time for your preference. Cooking time will vary depending on the thickness of the fillet. Once cooked, remove from the oven and cover with foil to rest.

To prepare the dressing, place all dressing ingredients in a screw-top jar and shake well to combine.

Slice the beef and arrange on a warmed plate or dish. Pour over the dressing and sprinkle over the coriander and spring onions.

We love to serve it with roast or mashed potatoes and steamed greens.

Little Chocolate Cakes

IMG_0539

These little chocolate cakes are amazing! They are substantial and light all at the same time. Sometimes when you have a mini-cupcake it feels like you haven’t eaten anything, but with these little beauties you’ll know that you’ve had one…but doesn’t mean you won’t be going back for seconds! They keep exceptionally well and I can promise you they’ll all be gone before there even a hint of them drying out.

This recipe yields about 30 mini-cupcakes or 12 cupcakes.

Ingredients
200g dark chocolate, chopped
100g caster sugar
120g unsalted butter
110g ground almonds
4 eggs, separated
Ganache
50ml cream
100g dark chocolate, chopped
sprinkles

Method
Preheat the oven to 180°C. Line muffin or mini-muffin tray with patty pans.

Roughly chop the chocolate and melt in a double boiler with the sugar and butter. Once melted, set aside to cool for 5 minutes.

Add the ground nuts and stir well. Beat in egg yolks, one yolk at a time, until well combined.

Whisk egg whites to stiff peaks. Stir a large spoonful through the chocolate mixture to lighten it up. Gently fold the remaining egg whites through.

Spoon the mixture into lined mini-cupcake moulds and bake for about 15 minutes. Be brave and remove them from the oven while they are still slightly squidgy in the middle. If making cupcakes bake for 25-30 minutes.

Once cooled, top with chocolate ganache and sprinkles! These little delights don’t necessarily need the ganache, it’s your choice!

This recipe was adapted from Jill Dupleix.

Want something else chocolatey? Try these pain au chocolat!

If you’ve enjoyed this post, please “like” it on facebook, or even share it. Thanks! x

Citrus Self-Saucing Pudding

This pudding is divine. I love chocolate, but I reckon I would rate this pudding above chocolate self-saucing pudding. The sauce has a great balance between sweetness and acidity. Serve with vanilla ice cream and the combination is magical. This pudding is perfect for all seasons.

Serves 4 -6

Ingredients
125g unsalted butter, softened
1 vanilla beans, split and seeds removed
1 tbsp finely grated lemon zest
Juice of 1 lemon
220g caster sugar
2 eggs
150g plain flour
1 tsp baking powder
80ml milk
2 tbsp corn flour
2 oranges, finely grated zest and juice of

Method

Preheat the oven to 180C and grease a 1.5 L oven-proof dish.

In a mixer beat the butter, vanilla seeds, lemon zest and half the sugar together until thick and pale. Add eggs, one at a time until well combined. Fold through the flour, baking powder and salt. Then fold through the milk until combined. Pour batter into prepared dish.

Mix corn flour and remaining sugar. Dust over the pudding batter.

Combine lemon juice, orange zest and juice and 1 cup of boiling water in a jug. Gently pour over the mixture.

Bake the pudding for 40 minutes or until the pudding is golden, or a skewer inserted comes out clean.

Cool for a few minutes and serve with vanilla ice cream.

DEEEELICIOUS!

If chocolate is more of your cup of tea, try my Gran’s chocolate self-saucing pudding, it’s also delicious.

This recipe was sourced from Delicious. magazine, August 2010.

If you’ve enjoyed this post please “like” it on facebook, or even share it. Thanks! x

Chicken pot pies


Chicken, leek and bacon…can’t go past that combo. Think it couldn’t get any better? Top it with a disc of puff pastry and it will!

The pie mixture needs to be cooled before cooking it as a pie. It can be made the day before and stored in the fridge overnight.

When I made these the other day I used homegrown leeks, parsley and lemon juice from our own lemon tree!

Straight from the veggie patch

Straight from the veggie patch

Makes 6

Ingredients
40g butter
1 tbsp olive oil
3 leeks, pale part one, finely sliced
4 bacon rashers
1kg chicken thighs
1 tbsp plain flour
pinch of nutmeg
200ml chicken stock
200ml sour cream or crème fraiche
2 tbsp parsley, finely chopped
2 tbsp lemon juice
2 sheets puff pastry
1 egg, beaten

Method
Melt butter and oil in a pan over medium heat. Add leek and bacon and cook until leek is softened, about 8 minutes. Add chicken and cook until slightly browned to seal. Stir in flour and nutmeg and cook for a further 2 minutes.

Add chicken stock and bring to a simmer. Simmer for about 15 minutes, or until chicken is cooked through. Allow to cool. Once cook remove the chicken and shred, not too fine though, it’s nice to have some decent sized pieces in your pie. Add the chicken back to the pot and stir through sour cream, parsley & lemon juice. Allow to cool completely.

Preheat oven to 200°C.

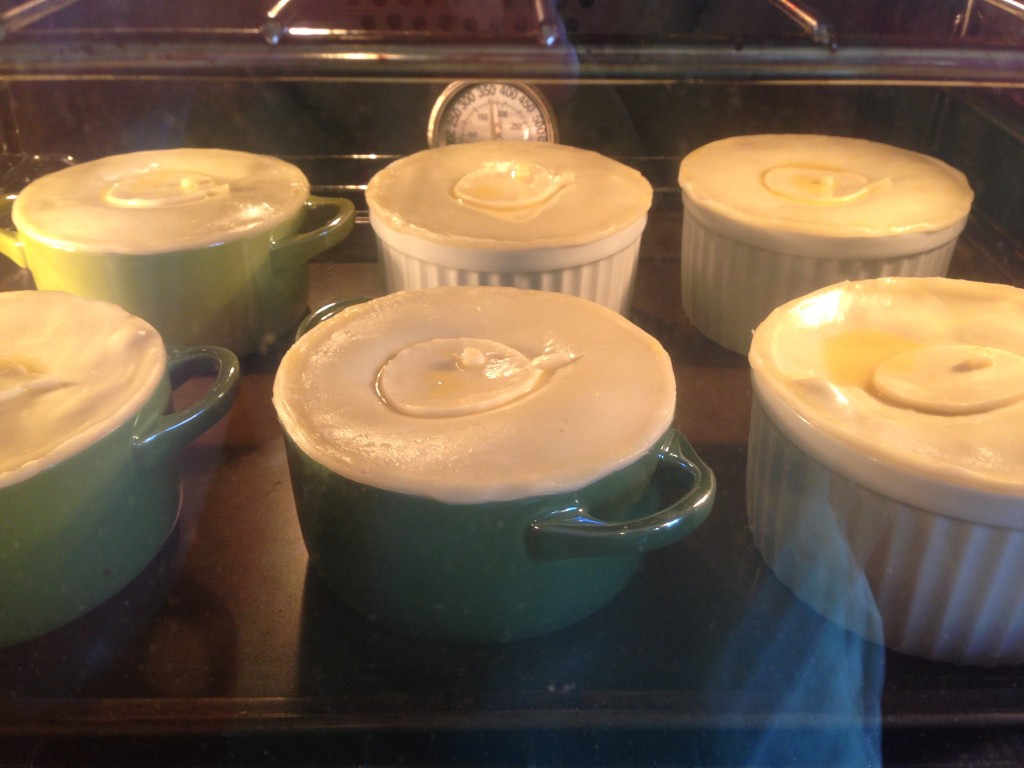
To assemble pies, fill ramekins to no more than 1cm from the top. Cut the puff pastry into rounds 1cm bigger in diameter than the ramekins. Push the pastry into the lip of the ramekin. (If you’re keen, there’ll be left over pastry for decorations).Brush the pastry with egg and bake for 20 minutes or until the pies are golden.

IMG_3082_fotor

Serve with mash & peas and enjoy al fresco!

Want a different pie? Try Beef & Guinness pies!

If you’ve enjoyed this post please “like” it on facebook, or even share it. Thanks! x

Pad Thai

Pad Thai

I picked up this recipe when I was living in the UK a few years ago. There were heaps of cooking shows on at the time (I’m sure there’s even more now) which introduced me to many chefs over there, as well as the BBC’s food website. This recipe is adapted from the website, and I honestly can’t remember who the chef was…but the recipe is simple and delicious.

I have tried many different ways of cooking the chicken (it’s best to cook the chicken separately to the rest of the ingredients). I’ve grilled, barbequed and stir-fried. But what I find works best is poaching the chicken. Flavour can be added to the chicken in the poaching liquid. I like to add a spring onion, chicken stock and chilli flakes, or a split birds eye chilli, to the liquid.

Serves 4

Ingredients
2 chicken breasts
2 free-range eggs, lightly beaten
1 onion, thinly sliced
2 garlic cloves, thinly sliced
1 handful green beans, chopped bite-sized
1 red capsicum, sliced
1 handful bean shoots
1/2 cup chopped coriander
1/2 cup chopped dry-roasted peanuts
375 g packet dried rice stick noodles

Sauce
2 tbsp soy sauce
2 tbsp tomato sauce
Juice 1 lime
1 tbsp fish sauce

Method
Start by poaching the chicken. Place the chicken in a saucepan so that it fits snuggly. Cover with water and add your preferred flavours. Bring to the boil. Once boiling cook for a further 10 minutes, remove from the heat and set aside.

In a wok, scramble the eggs until just cooked (even slightly soggy). Remove from the wok and set aside. Add the onion and garlic and sauté until soft. Add the capsicum and beans and stir-fry for a couple of minutes. The rice noodles will need to be on about now, cook as per packet instructions.

Shred the chicken and add to the wok. Add the sauce to the wok and stir to coat. Add the cooked rice noodles, egg and bean shoots. Gentle toss everything together. Top with coriander and nuts.

If you like this one, you will probably like caramel chicken!

If you’ve enjoyed this post, please “like” it on facebook, or even share it. Thanks! x

Brioche buns

IMG_2976The humble burger seems to be getting around in a brioche bun these days. It’s light and fluffy and has a slight sweetness to it. Andy’s been dying for one so we gave it a go on the weekend. I haven’t made brioche before and was surprised at how well it turned out. It was really very simple. The recipe I was looking at, which Dad took home from a cooking class at Libertine, had a lot of sugar in it. It seemed too much for our savoury purpose, so I halved it.

This recipe will yield 12 buns or 1 loaf.

Ingredients
300ml milk
30g sugar
7g (1 sachet) dry active yeast
500g flour
15g salt
1 egg
125g butter, softened
Egg wash
1 egg
100ml milk
1/2 tsp salt

Method

Heat milk and sugar on the stovetop to 40°C. Add yeast and leave for 10 minutes until it starts to foam. Meanwhile, in a stand mixer bowl measure out the flour and salt. Once the yeast mixture has foamed add to the flour and knead on a low speed to incorporate. Add the egg and the butter. At first this will be a sloppy mess and you’ll wonder how it will ever come together (or at least that’s what I thought) and then all of a sudden it becomes beautifully smooth. Increase the mixing speed and knead for about 10 minutes.

Shaping brioche bunsProve in the bowl for 30 minutes. Remove from the bowl and place on a floured bench. Divide into 12 portions and shape into balls. I create a circle with my thumb and index finger on one hand and push the dough through with the other. This creates a nice uniform ball. Place the balls on a baking paper lined tray, evenly spaced. Cover with a damp tea-towel and allow to rise for about 2 hours, or until doubled in size. Brush with egg wash and bake for 15 minutes. The buns should be golden and sound hollow when tapped on the bottom.

Serve with your favourite burger and fillings!

IMG_2978

If you’ve enjoyed this post please “like” it on facebook, or even share it. Thanks! x

Zucchini & Gruyere Souffle

IMG_2833

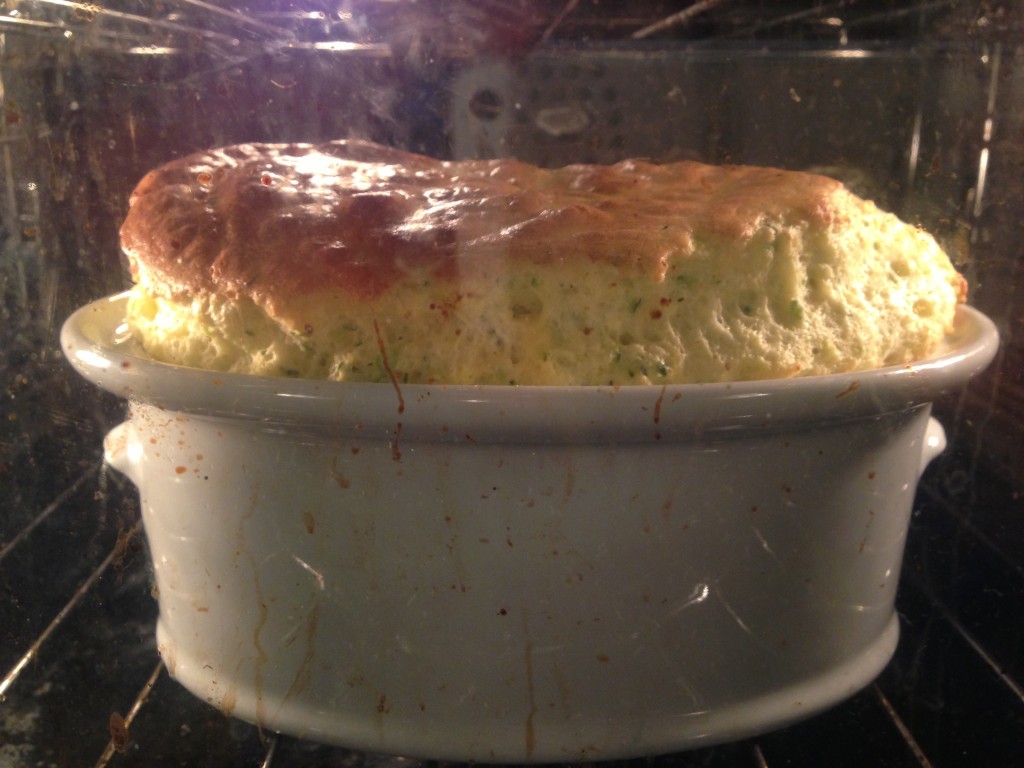
Excuse the dirty oven, I have cleaned it since…

Light and fluffy, this is an excellent option for when you’ve had enough meat for the week. But even better as vegetarian protein option for a dinner party. Your vego friends will love you because it’s that good! It might sound bizarre as a dinner party option but a lot of it can be prepared ahead of time. Just before putting in the oven all that needs to be done is whisk the egg whites, fold them through the roux and bung it in the oven for 30 minutes. Timing is important though; you don’t want the soufflé sitting around out of the oven before serving so make sure you know when all your other delights will be ready.

The WOW factor occurs when you whip that soufflé out of the oven and take it straight to the table. Some of Dad’s oldest friends wax lyrical, 30 years after the event, when he pulled individual chocolate soufflés out of the oven on the dot of midnight at a New Years Eve dinner party. I’d be a rich woman if I had a buck for every time I heard that story…

This soufflé feeds 4 for dinner with other veggie accompaniments. I prefer to serve it with roast potatoes and a spinach & almond salad. Something crunchy next the soft soufflé makes a great textural combo. This recipe was adapted from The Food of France.

Ingredients
1 tbsp butter, melted
2 tbsp breadcrumbs
350g zucchini, 1cm slices
125ml milk
30g butter
30g plain flour
85g gruyere, finely grated
3 spring onions, finely chopped
4 eggs, separated

Method
Preheat the oven to 180C. Brush a 1.5 L soufflé dish with melted butter. Tip in the breadcrumbs to coat the dish. Tip out the excess crumbs. This will make sure the soufflé doesn’t stick to the dish, but will also help it rise.

Cook the zucchini in boiling water for 10 minutes, or until soft. Drain and when cooled slightly push some water out of the zucchini. Whizz in a food processor with the milk until smooth. If you do not have a food processor, or can’t be bothered with the washing up, use a potato masher to blend the zucchini and milk until smooth.

Meanwhile, melt the butter in a heavy-based saucepan. Add the flour and cook for 2 minutes. Add the zucchini and milk mixture and continue to stir until thick and smooth. Boil for 3 minutes. Remove from the heat and stir through the gruyere and spring onions. Add the egg yolks one at a time, stirring each until well combined. Everything up until now can be prepared ahead of time. If finishing it off later cover with cling film so that the cling film sits over the mixture. This will ensure a skin doesn’t form.

Whisk egg whites until soft peaks. Stir a ¼ through the roux (zucchini mixture) to lighten it up. Fold through the remaining egg whites and delicately poor into the prepared dish (if too heavy handed all the airiness of the egg whites will be knocked about). Bake for 30 minutes. The soufflé is cooked when it wobbles very slightly when wiggled. As it hits the table it will cook a little further, making it perfectly cooked by the time it’s served.

If you’ve enjoyed this post please “like” it on facebook, or even share it. Thanks! x